Depending on the desired effect and the situation (nearby, far off), you can apply stronger or less strong lines. To create a more subtle effect, you can mix the dark brown with the basic colour on the spatula or on your hand. This makes the colour that you use for shadowing less powerful.

The more subtle you work, the more natural the result.

Important areas for shading are the eye sockets, the temples, the side of the nose and below the cheekbones. The vertical frown wrinkle and the naso-labial ('nose-lip') fold are also important areas to shadow.

You draw the lines with a flat sable-hair brush. By placing it obliquely on the skin you get a sharp edge on one side and a fading effect on the other side. To determine which side should be sharp and which side faded, you start from the centre of the face (nose). Create a fading effect towards the outside. The lines from the eyes towards the forehead (vertical frowning wrinkles) and the naso-labial ('nose-lip') fold are therefore sharp in the direction of the nose and more blurred towards the outside. The naso-labial fold is easier to locate if one grimaces. Bags under the eyes are sharp on the lower side and must be faded towards the upper side.

The parts of the face that have not been shaded now seem to have been brought forward.
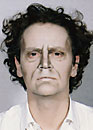
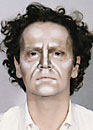
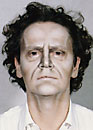
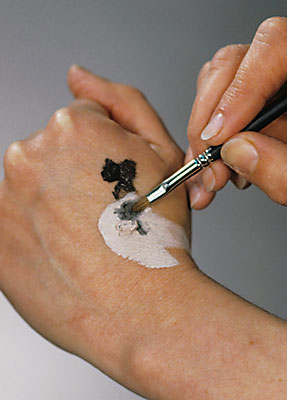
LIGHTENING

If the non-shaded parts are lightened, this will enhance the effect of bringing those areas "forward".

Apply white make-up to the higher parts of the forehead, above the temple, next to the frown wrinkles on the wings of the nose and on top of the nose. The eyebag is also lightened a little.

Between the higher parts of the brow some subtle shadowing is done to generate more depth.

For the best user experience, we make use of functional cookies and cookies for the managing of web statistics, advertisements and social media.