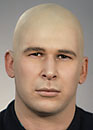
BALD CAP
Baldcap

Grimas Bald Cap is a single-use, transparent, elastic plastic bald cap for use in film, TV and theatre. The Bald Cap is available in a single size and is sold individually.

Procedure
First degrease and clean the skin you are going to be working on with Grimas Cleansing Lotion. Then dry the skin with a tissue.
Ball both hands into fists and put them into the Bald Cap, stretching it a little so that you can check it. Stand behind the subject and ask them to place their thumbs vertically with the nails against their forehead so that the Bald Cap can catch against them when placed with a front-to-back movement. Ensure that the point at the front is well centred and that there is sufficient space below the hairline for adhesion.
Arrange the Bald Cap so that it is smooth and tight, covering the head properly without any wrinkles.

First attachment stage
Fold the front edge back and apply an adhesive edge of about 2 cm just below the hairline with Grimas Mastix Extra. For a natural effect, you follow a possible natural line in the forehead. Let the adhesive edge go as far as the temples. Bring the edge back to the forehead and press gently to distribute the adhesive. Then fold back the edge again. Allow to dry for about 15 seconds and then apply to the forehead again: make the Bald Cap fit tight to the head, without wrinkles.

Freeing up the ears
Mark out the ears. When you finish off the edges with acetone you are also immediately removing the sketch made using the Make-up Pencil. When you start cutting the Bald Cap to size, it must be stretched tight. To make sure that the Bald Cap does not tear because of the tension and the cutting, use acetone to melt a hole in the Bald Cap at the point that you are cutting towards.
You should proceed as follows: Pull the Bald Cap down at an angle to tense it. Dip a cotton bud in acetone (don't work too wet) and melt a small hole in the Bald Cap at precisely the right place: 2 mm below the point where the top of the pinna (the 'shell' of the ear) leaves the head.
Hint: if necessary, you can melt multiple holes along the line for easy cutting.
Then cut carefully up from the bottom edge vertically to the hole. Now do the other side. Get the ears out from underneath the Bald Cap.
Cut the shape of the Bald Cap in the same way alongside the sideburns and make sure there is enough space to attach it. You can always make changes to the edge later using acetone.

Second attachment stage
Get the model that will wear the Bald Cap to sit up straight. Now make a glued edge of approximately 2 cm along the sideburns. Let this adhesive edge fit up exactly against the glued edge on the forehead. There must not be a gap between them. Use the same principle: fold back, apply adhesive, reposition the side edge, press gently and fold back again. Allow to dry for about 15 seconds and then apply along the sideburns again.
Now go to the back of the head. To make sure that the Bald Cap does not tear, you use acetone to melt a hole in the Bald Cap at the point that you are cutting towards. Fold the Bald Cap back. Apply a glued edge of approximately 2 cm along the hairline of the neck as far as about half-way behind the ears. Pull the Bald Cap with some tension over the back of the head, whilst pulling the sides forward. This ensures it fits neatly and is tensioned appropriately. Fold it open again, allow to dry for 15 seconds and then close the Bald Cap for the last time.

Finishing the edges
Note: you finish the edges using cotton buds with acetone. You need 15 to 20 cotton buds for this, because the acetone dissolves the plastic. Don't dip used cotton buds back in the acetone.
Take a cotton bud with acetone and make a small hole on the forehead, in the middle of the adhesive edge. Cut vertically up to the hole. You start working from this hole with acetone to create a clean transition from the Bald Cap to the skin. You proceed as follows: you rub the tip of a cotton bud dipped in acetone horizontally a number of times over the middle of the adhesive edge and then melt it downwards in a vertical motion.
Note: do a little piece at a time, and stay in the middle of the adhesive edge so that you are following the shape of the adhesive edge. Make a small hole at the middle of the adhesive edge at the back as well; cut up to it and then proceed in the same fashion from the back of the head towards the back of the ears.

You colour the Bald Cap with Grimas Camouflage Make-up Pure or with the intense Crème Make-up Pure colours.
Work from the spatula or stick with a dry and clean Make-up Sponge and apply the Camouflage Make-up Pure with a dabbing action. Work from the middle of the Bald Cap outwards toward the edges. Merge into the face make-up if necessary.
Powder off with Grimas Transparent Powder, Fixing Powder, Make-up Powder or Colour Powder to matt/fix the make-up.

Removing the Bald Cap
Detach the adhesive edge with a cotton bud soaked in Grimas Mastix Remover. Remove the adhesive and make-up residues with Mastix Remover. Massage Grimas Multi Remover Pure or Cleansing Cream into the skin and remove with a tissue. Cleanse the skin afterwards with Grimas Cleansing Lotion.

For the best user experience, we make use of functional cookies and cookies for the managing of web statistics, advertisements and social media.