PROCEDURE

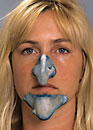
Place the latex application on the skin to get an impression of whether the edges are a good fit and where it is going to be glued on. Apply Transparent Powder to where the edge merges into the skin to mark out the exact spot.

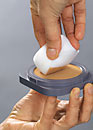
Pack some cotton wool into the Latex Nose. This absorbs the perspiration.

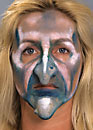
Pre-colour the nose with white Cake Make-up and some Water Make-up (Pure) basic colour if necessary.

= Transparent Powder
LATEX PROSTHETICS = Latex prostetics
CAKE MAKE-UP = Cake Make-up
WATER MAKE-UP (PURE) = Water Make-up Pure
First apply the chin and then the nose.
Apply a little Grimas Mastix Extra to the inside of the scales/adhesive edge and allow it to dry for a few seconds. Do the following to get the correct degree of adhesion: press the latex prostetic lightly in place and then remove it again straight away. Wait a few seconds and reposition the application, pressing the edges in place with a tissue.
Protect the eyes by closing them and covering them with a tissue. Can cause serious damage to the eyes.

Then you paint the character using Water Make-up (Pure), applying the aging principle. Apply white make-up to the higher parts of the forehead, above the temple, next to the frown wrinkles on the wings of the nose and on top of the nose.

WATER MAKE-UP

Water Make-up works just like watercolour paint. Use the brush and a little water to soften the make-up and make it a bit pasty. Test the colour intensity on the hand. Don't work too dry, but do not use too much water. Water Make-up (Pure) dries within 15 seconds. If you do not want the colours to mix, be sure to wait for the first layer to dry before you work over it.

Hint: Regularly change the water you rinse your brushes in and preferably work with two water bowls: one for light and one for dark shades. Cotton buds

The shape, width and quality of the brush are to a great extent qualifying the effect you can achieve with it. For instance, round brushes are ideal for making curves and drawing curls. You draw straight lines preferably with a flat brush, keeping the handle of the brush pointed in the direction of the line. To draw a thin line, you do not necessarily need to use a narrow brush. You can also use the edge of a flat brush for that. This brush is also very convenient for making a thick line merge into a thin one, turning the brush on its side in one fluid action as you go automatically changes the line from thick to thinner. When you come to the end of a line, lift the brush from the skin in a single smooth movement.
For the best user experience, we make use of functional cookies and cookies for the managing of web statistics, advertisements and social media.